Category Archives: Articles

Sound Issues in iOS

Category : Articles

If you ever don’t hear any sound while in the iOS app, this article may help you.

One thing to know is that if your phone/tablet has been asleep or the BlueRail App has been left in the background while you use other apps, the sound may not work. This can be rectified by closing the app completely (double-click and swipe the app upward) and restarting the app.

If this doesn’t solve your problem, here are a couple of suggestions for getting sound working:

First, make sure the BlueRail app is turned off entirely (and not running in the background) .

Check the little mute slider on the side of the phone/ipad.

Use the volume buttons to turn volume up.

Touch the home button and slide finger upward to bring up the grey settings bar (may take a couple of attempts). Make sure the volume is all the way up on this screen. On this same screen, make sure the “moon” (do not disturb) is turned off.

Now see if the sound is working.

If not, the two things to try are:
1) go into sounds and switch ringtones momentarily.
2) restart device.

Also, some iOS devices give you the option of using the little side slider to “lock orientation” (instead of for muting purposes). This option is generally controlled from:

Settings>General>Use Side Switch to: Mute System sounds / (Lock Screen Rotation )

If you have the side switch set to “lock screen rotation” then the system sound control is in the task bar. Access the task bar (described above), swipe all the way to the right. The speaker icon is all the way to the left. Tap on it and system sounds will return.


Considerations for using BlueRail board in larger gauges

Category : Articles

BlueRail’s first board targets HO steam tenders, S, On30 and lower amperage O and G trains.  A narrow board (more appropriate for for HO diesels) and a high amperage board will be released subsequently. Many people are happily running this first board in their O and G locos. Understanding the board’s amperage specs is key to deciding if this first board will work in your larger scale loco.

The first basic thing to check (regardless of amperage) is to make sure your DC can motor(s) is electrically isolated from both the chassis and the track. This is a necessity for using any train control system to run your loco. Please refer to THIS ARTICLE to test that.  It is also of course key that you have determined you have the space somewhere to put the board.

The second thing (which is related to amperage) is knowing your locomotives SLIP and STALL current. HERE is an article on how to determine your loco’s stall current.  HERE is a great online reference I have found with the stall and slip currents of many trains already listed.  The idea is to understand how many amps your loco draws when it is trying it’s hardest (ie pulling 100 cars uphill).  There is also a second part of this related to how slippery your wheels are. If your wheels start slipping under a certain amount of load, your loco will never actually reach it’s full stall current (when pulling many cars uphill). For this reason, that site lists both the “slip” stall current and the “hard” stall current.  When testing stall current yourself, this is a factor of how hard you push down while testing (ie hard enough to keep the wheels from turning or not). If your loco has a SLIP current of 2 amps or less, it is a candidate for this BlueRail board.

Overload ProtectionThe maximum amperage support from the board follows a curve (in RED above). Locos generally draw higher current when they first start rolling. For this reason, the board is designed to handle 8 amps for the first 1/2 second and 4 amps for the first second. This is to give some extra headroom as you first start to roll. After 15 seconds of continuous pulling, the curve is down to 2 amps.  The board assumes you have a little momentum going by then, and your loco is not close to “stalling”.  After 1 minute of continuous pulling, the amperage support eases down to 1.2 amps.  If the board senses the max amperage support has been exceeded, it shuts itself off  (via a PTC fuse) and protects itself.

For discussion purposes, referencing a G scale Bachmann 4-6-0 on the chart we see a “slip” current of 1.5 amps and a “hard” stall current of 4 amps.  Depending on how many cars it is pulling and how steep and long the inclines are, it can be kept within the board’s amperage curve.  This loco may be able to pull 10-14 cars on a level layout, and perhaps 8-9 cars on an incline. Pulling 20 cars up steep inclines that last more than a minute (on the other hand) would likely trigger the onboard protection.

The objective is to consider your loco’s slip and hard stall current, how many cars you intend to pull, and how steep and long your inclines are, and decide if this first board is in the ball park.  With the board in place, run your train with a couple of cars, and add a few more till you find the “sweet spot” as to how many cars you can pull (on both level track and an incline).  Don’t start right off pulling 20-30 cars. The durability of the PTC fuse is a factor of how much you exceed the amperage draw by, so if you throw 10 amps at it all it once you could damage it.  But as long as you gently find your limits and then stay within them, you should be fine.

You can wait around for the higher amperage board (we do not yet have a release date on that) but the truth is, this current board might be sufficient for some of your locos. Please visit our User Showcase to see some of the locos this board is currently used in.

Large-Scale-Decision-Chart


Using an old BlueRail Blue Horse board to run DC trains and lights on a conventional train set

Category : Articles

This article is written about the old “Blue Horse” boards. Similar behavior can be achieved using BlueRailDCC boards, but BlueRailDCC boards do not support multiple LEDs.

You can use a BlueRail Blue Horse board to control a DC train layout and up to 4 lights or accessories from your smart device. Use the diagrams below to see how to easily modify a 9 wire harness and connect a power supply. This is a great simple solution for HO, N or even Z train sets. You cannot control separate trains independently, but you can control either a single train or multiple locos as a consist.

Using a BlueRail board to run DC trains on a conventional train set


Note: to simplify the diagram, the colored wires on the 9-pin plug in these diagrams are not in the proper order. Please use the wire color to make your connections.

The diagram below shows how to power up to 4 low voltage LED lights on your layout. These can be independently controlled from your smart device in the “Light Panel”.

Using a BlueRail board to power low voltage lights on a conventional train set


BACK-EMF NOTE: If you plan on using multiple BlueRail boards to control different blocks on your layout, you will need to turn off back-EMF in each board. This is accomplished by going into the “Settings” screen in the app for each board, and toggling on the “Advanced Tuning” panel. Then, using the “Tuning Fork” button (now accessible in the Train Control screen) set the following three settings to a value of “0”: Proportional, Integral, and Differential. With all 3 PID values set to “0” back-EMF will be turned off. If you do not turn back-EMF off, you may find that your locos slow down briefly as they enter each new block.


Example Videos

For the Bachmann Trolley, N scale trains and some other conventional locos you may achieve improved slow speed performance by adjusting the “Differential” value in the Advanced Tunings to “0” (instead of the default of “.235”). You’ll find this in the board “Settings” screen by clicking the little cog on the train control screen.


Wiring directly to a Bachmann loco (R, M+, L-, B+, L+, B-, M-, L)

Category : Articles

The BlueRail board can be used as a plugin board (plugging into a DCC-Ready port) or as a complete replacement PNP board. Sometimes when putting the BlueRail board into a tight place, it is preferable to remove the old board to make space for the BlueRail board. On Bachmann boards, each wire usually has a letter code where it is soldered to the board. Here is a list of some of the letter codes to help you determine what each wire leads to:

Letter Code Purpose NMRA wire color
R Right Rail (+) Red
L Left Rail (-) Black
M+ Motor positive Orange
M- Motor negative Grey
L+ Light positive Blue
L- Light negative White, Yellow, Green or Violet
B+ Battery positive
B- Battery negative

Once you have identified each wire, simply connect them to the color-coded wire on the 9-pin harness as in this diagram:

BlueHorse datasheet - small


Tuning Locos and the Advanced Tuning Panel

Category : Articles

This article is about the “Advanced Tuning Panel” in the BlueRail App. For the vast majority of users, you just drop your board in and you’re off and running. But electric motors can vary from loco to loco, and its inevitable that there are going to be some locos that need a little additional tuning to the default settings in order to achieve smooth slow speed operation. For this reason, we have included an “Advanced Tuning” panel in the BlueRail app – to allow users to “tweak” slow speed operation. This article is for those people.

So how do you know if your loco needs advanced tuning? Symptoms that you might need advanced tuning are if your loco jiggles a little when traveling at slow speed, or if it starts to roll, then stops.

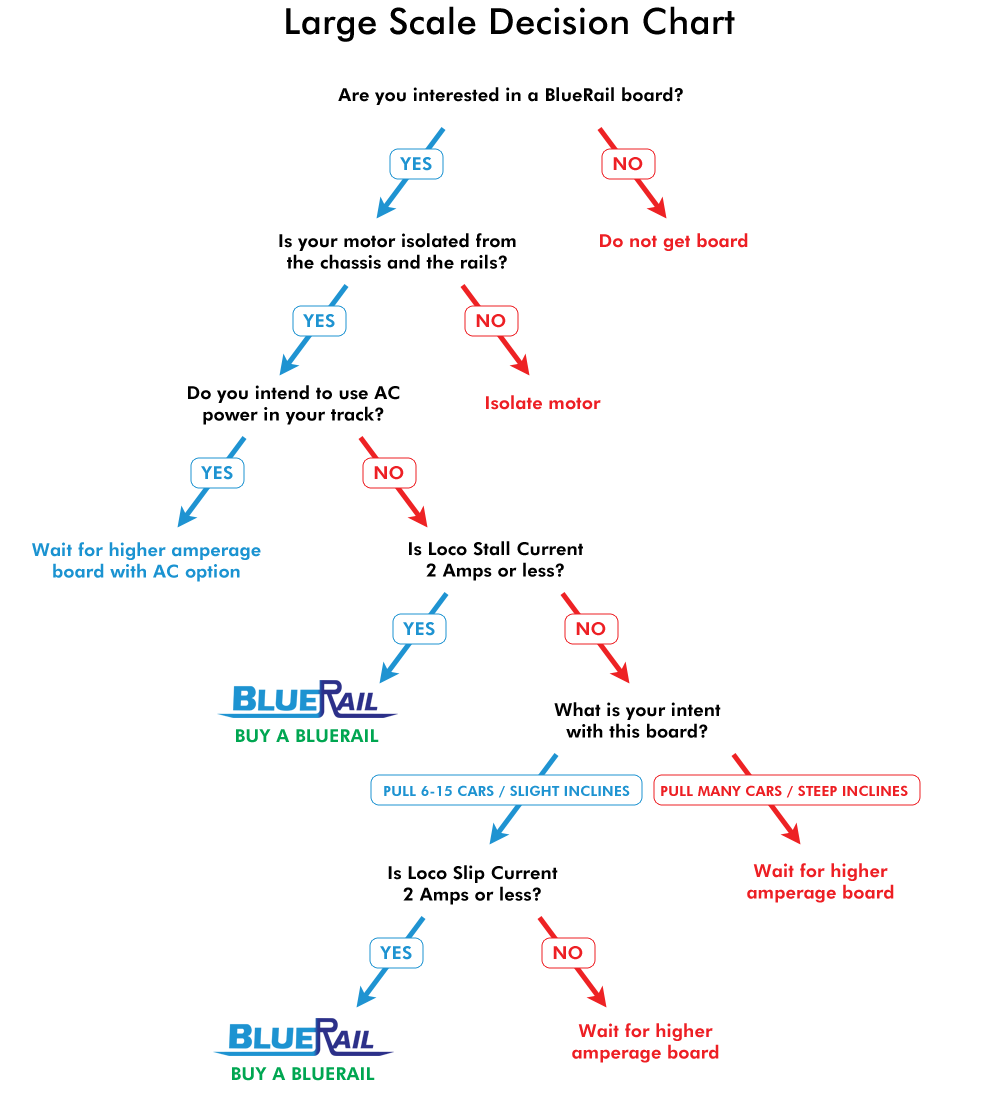
If the loco is stopping immediately, you’ll also want to read the articles about “measuring you loco’s stall current” and “verifying your motors are isolated from the chassis and the rails“. You can recognize stops related to amperage issues, because they are usually followed by a “cool-down” period, after which a fuse in the board resets itself (or you may have to turn the board off and back on).

You’ll know your loco is stopping because of a tuning issue, because you can immediately run the train again the moment after it stops.

A little technical background, we use Pulse Width Modulation to run the loco motors. This is essentially a sine wave with 16,000 pulses per second. The exact shape of this sine wave is defined by an equation (we’ll call the PID equation), and this equation has 8 variables that dictate the shape of the waves. By adjusting these 8 variables, you can “tune” the shape of the wave to pretty much any motor. At BlueRail we have tuned these 8 variables to values that seem to work for 90% of the locos out there (we call these the default tunings). If you’re loco is jiggling at slow speeds, or starting then stopping (and its not an amperage issue) then it’s time to play with the tunings.

Some of the tuning variables you may be familiar with. Start Voltage is one. Three popular options for Start Voltage (0v, .6v and 1.2v) can be found in the loco settings screen.

Start Voltage simply gives your loco a little extra voltage so it doesn’t take so long to get rolling. Its kind of like “frosting” on the tuning settings, so when diagnosing a tuning issue it’s safest to set the Start Voltage to 0. This is because Start Voltage can cause issues if it is set too high. You can always come back and add some Start Voltage in the end after you are happy with your loco tuning.

The first tuning variable you want to play with (after setting Start Voltage to “0”) is the “Update Period”. The Update Period dictates how often (in milliseconds) that the loco speed is measured and the PID equation gets run. The most popular settings we have found for this are 10ms, 20ms and 35ms. So inside the settings screen you’ll find these 3 options. Try these options, and see if they affect you’re locos initial take-off. If they don’t, it’s time to go to the “Advanced Tuning” panel. To get to the Advanced Tuning panel, go into the loco settings screen and scroll to the bottom till you see “Advanced Tuning”. (The Loco Settings screen is accessed by clicking the “Cog” in the Train Control screen).

Turn on the Advanced Tuning panel (by sliding the toggle). When you return to the Train Control screen, you will see a small “Tuning Fork” button at the left of the screen. Slide that out to access the Advanced Tuning screen. (This screen will look slightly different based on whether you are using Android or iOS.)


Advanced Tuning Panel


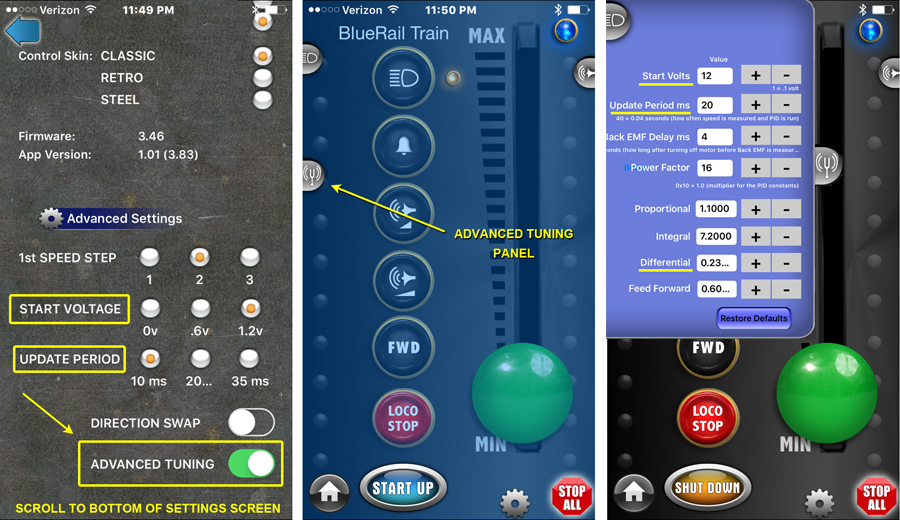
In the Advanced Tuning screen, you will see all 8 variables that control the PID equation. You’ll recognize “Start Voltage” and “Update Period” at the top of the panel, displaying the numbers you have selected in the loco settings screen. (Please note Start Voltage is displayed in tenth of 1 volt, so 0v, .6v and 1.2v display as 0, 6 and 12).

To play with the tunings, make sure the Start Voltage is at 0, and begin tweaking the “Update Period” as you run your loco (using the up and down arrows). Try numbers below 10ms and above 35ms, and see how they affect your loco starts. Don’t use values below 0.

If this doesn’t really have any affect, set the Update Period to a middle value (20 ms) and move down to the “Differential” field (second from the bottom). This is the second most common PID variable that can affect slow speed performance. Try setting Differential to “0” and run your train. I have found Bachmann trolleys, N Scale, and some older trains need a setting of “0” to start properly. If that doesn’t work, try setting the Differential higher than the default setting of “.23”. If you CAN find a Differential setting that has a positive impact on your slow speed takeoffs, go back to your “Update Period” and see if you can use it to refine things. If not, you can move on to the other variables (Proportional, Integral and Feed Forward…) to see if you can get any affect from tweaking them.

There is a “Restore Defaults” button in the panel (to bring you back to the original default tunings) so don’t worry about trying different settings.

“Power Factor” acts as a global power multiplier which you might as well leave at 16.

If you DO find tunings that improve the low speed performance of your loco, please email BlueRail with your settings and the type of loco you have. We will add this to our database of presets so future users with the same loco can utilize your settings.

Thank you for your patience and feedback in helping us find the best tunings settings for every model of locomotive on the market. With your help we will add them to the app as presets so future users can avoid having to tune their locos.


Charging Batteries from BlueRail Trains

Category : Articles

The batteries supplied by BlueRail Trains are high quality commercial cells. These are not RC cells. They come from a factory that makes many batteries for the medical industry.

It is best to charge 250 packs at 100mA(.1 amps), 400 and 450 packs at 200ma(.2 amps), 500 packs at 300mA(.3 amps), and 850 packs at 400mA(.4 amps). The pack is a 3S or 11.1 volt pack. The charger should be set accordingly.

Only use a charger that is designed for Lithium Polymer batteries.

The recommended battery charger is the HiTec RC X1 AC Plus. User can set the charge rate. They are very reliable. The X1 AC Plus is available at RC shops and on Amazon.

Another good charger we have found is the iMax B6AC Dual Power. I have been told that the IMAX B6AC v2 requires a balance connector to be present by default (our batteries do not have or need balance connectors). This default can be changed in the iMAX system settings (Balance Connector = NO).

Do not charge with the cheap wall plug in chargers. The charge rate is usually 500ma to 1 amp. This is to high a charge rate. The charger is not programmable.

These packs have a small PC board on each cell. This is called a PCM. It keeps the battery from over charge, short circuit, over discharge, and low voltage.

Low voltage is especially important. It cuts off the discharge at 3 volts per cell or 9 volts. Running an unprotected pack until it stops can and will damage the battery.

Packs from the RC world do not have PCMs. The RC packs are designed for high discharge rates. They would trip the PCM, which is set to trip at 3 amps discharge.

After tripping, the PCM will reset after a few minutes.

DeadRail Kit Battery Size Options:

11.1 volt batteries for the DeadRail kit come in a variety of sizes:

Capacity Length Width Height Charge Setting Comment
250mA 33mm 25mm 18mm 100mA Smallest size available
450mA 46mm 23mm 18mm 200mA Medium size
500mA 40mm 27mm 18mm 200mA Medium size
850mA 52mm 31mm 18mm 400mA Large size – good for larger scales

The 450mA and 500mA batteries are comparable in size to a 9-volt battery.

A popular strategy is to use a 250mA battery (which has the smallest profile) and situate the battery in a place where it can be swapped out for recharging.

The number of running hours per charge varies based on the amperage draw of your loco, the number of cars you pull, and inclines on your layout. Some users get 1-3 hours per charge.

Some safety precautions for all lithium batteries:

Charge only at recommended charge rates.

Never leave the batteries unattended while charging.

Charge on a nonflammable surface.

Do not charge near flammable objects.

Don’t get the packs wet.

If the cells start to swell or grow in size, discontinue use.

Do not attempt to disassemble the battery pack.

Do not puncture the cells with sharp objects.

Store at room temperature

Dispose of properly. Not in the trash.

Batteries provided by DeadRail Installs.


Updating Android / iOS

Category : Articles

It is very important when using Android (or iOS) to run bluetooth trains that you update your device to the latest software available for your model.

If you are NOT running the latest version available for your device, you may have bluetooth bugs that will affect bluetooth performance.

The minimum version of Android supported is 4.3.


Apple Logo

General method for updating iOS:

Settings >> General >> Software Update

Android ogo

General method for updating Android:

Settings >> General (scroll down) >> About Device >> Software Update


Most devices provide a back-up method (which is recommended prior to performing updates).

Please use the links provided below to learn more about updating your specific device:


Updates from Wireless Providers:

Verizon Wireless Software Updates
ATT Wireless Device Support
Sprint Device Support
T-Mobile Software Updates

Updates By Manufacturer:

Apple
BlackBerry
Google (Nexus)
HTC
Kyocera
LG
Motorola
Nokia (Microsoft)
Pantech
Samsung
Sony


How to update to the latest BlueRail App on your smart device

Apple Logo

General method for updating iOS:

App Store >> Updates (Lower Right)

Android ogo

General method for updating Android:

Play Store >> (Click three bars in upper left of search box) >> Apps & Games >> My apps & games >> Updates

Sometimes the Google Play store will cache the page from the last time you opened Google Play (and not display the latest available updates). To “clear the cache” on your Google Play store, do the following:

Settings >> General >> Applications >> (scroll down) Google Play Store >> Clear cache


BlueRail Trains Dead Rail System

Category : Articles


The Dead Rail kit is the first battery power system that is truly plug and play. The kit includes a board, lithium protected battery, magnetic reed switch, a 9/8 pin wire harness, and all connections (assembled). The harness included in the kit is a 9 pin NMRA JST plug to 8 pin NMRA plug. Please use the following guidelines when installing your kit.

Magnetic Reed Switch
Be very careful when trying to bend the leads on the magnetic reed switch. Never put pressure on the glass part. Only try bending when holding the leads. Needle nose pliers are good for holding the leads while bending.

On/off Switch
Mount the on/off switch on a spot near the top or side of the tender or loco shell. Use a reasonably strong magnet. The magnet will work through a plastic shell. A metal shell might require some testing to find a good spot.
Do your experimenting before removing the protective sheet over the adhesive. The on/off switch doesn’t need to be attached to the loco as long as it is not in the way of removing the battery.

Battery
Use a programmable charger. Wall plug in chargers have been known to fail. They charge at a constant rate which may be too high for smaller lithium batteries.

Recommended is the Hi Tec RC X1 AC Plus. There are other programmable chargers available. Make sure it has the capability to charge at .1 or .2 amps. Many chargers come in DC or AC versions. DC versions require a separate power supply. AC versions plug into the wall.

http://hitecrcd.com/products/chargers/acdc-chargers

Charge the 450ma 11.1V pack at .2 amps or 200ma.
The battery pack has protection on the cells. This protects against over charge, over discharge, and short circuit. The pack will stop working until the fault goes away. Then the boards will reset and the battery will charge or discharge again. If this happens, discover what the cause is.

If the system doesn’t work:

Is the battery plugged in correctly? It is possible to plug the battery in backwards. The plug is polarized. Nothing will happen.
Is the battery charged?
Is the on/off switch in the on position? The red light will be lit when on. The green light will blink on the BlueRail board.
Is the harness plugged in tight?

Article about Battery Charging

Dead Rail Plug and Play System


Understanding and Troubleshooting Bluetooth Connections

Category : Articles

This article explains connecting and disconnecting from a bluetooth train.

When a train or board is powered up and in range, it should appear in the home screen of the application with the option to “connect” or “disconnect” from any train. Once you have “connected” to a train it is no longer visible to other users (or other applications) until you choose to “disconnect” from a train.

If a board or train is powered up and in range, but you do not see it in the app home screen, there are two probable causes. Either bluetooth is turned off in your device or the board is being occupied by another user (or application).

IS BLUETOOTH TURNED ON?
The app attempts to alert you whenever bluetooth is turned off, but if you are not seeing a bluetooth board this is the first thing to check. Bluetooth is managed in the “settings” of your phone/device. Be aware that being in “Airplane Mode” will generally turn off bluetooth.

IS ANOTHER DEVICE OCCUPYING BLUETOOTH BOARD?
If a train or board is powered up and in range and still not visible, check to make sure there is not another smartphone or tablet in range running the BlueRail or E-Z App that may be occupying the board. You must choose “Disconnect” (or close the app entirely) from the occupying device to make it available to other users.

One definitive way to “release” connections is to temporarily kill power to the board/train. This will cause the board to reboot and become available for connections.

IS YOUR DEVICE’S SOFTWARE UP TO DATE?
It is very important when using Android (or iOS) to run bluetooth trains that you update your device to the latest software available for your model. Please refer to THIS ARTICLE about how to update your device to the latest version of Android.

IS ANOTHER APPLICATION ON SAME DEVICE OCCUPYING BLUETOOTH BOARD?
If you run both the BlueRail app and the Bachmann E-Z App on one device at the same time, it is possible for one app to occupy a train, making the app unavailable in the other application. Please make sure all other bluetooth train control apps are completely closed when running your train.

RUNNING BLUETOOTH IN A GROUP ENVIRONMENT
When operating bluetooth trains in a group environment, please turn off “Auto-Connect” from the home screen of your app. Auto-Connect is a handy feature for use at home, enabling your device to automatically connect to all trains (saving you from having to hit the “Connect” button). When operating in a group, turn this off and manually connect to trains using the “Connect” button. To make a train or board available to another user


Using 8-pin Connectors

Category : Articles

There are several general methods for connecting a BlueRail board to a locomotive.

9 PIN CONNECTOR
If you are plugging your BlueRail board into a “DCC-Ready” locomotive equipped with a 9-pin connector, simply plug the board into the connector (and you are done).

8 PIN CONNECTOR
If you are plugging your BlueRail board into a “DCC-Ready” locomotive equipped with a 8-pin connector, it is important to orient the connector correctly (as the pin can be inserted one of two ways). Please refer to the diagram below for reference.
NMRA 8 pin plug
The circuit board in your locomotive should have a small triangle or dot indicating where the number 1 pin (orange) should go, which will help you orient the 8-pin connector correctly. (It is possible the number 1 pin location is not marked.) If you connect the pin in the wrong orientation, your locomotive will run backwards and the lights will not work. If after installation you find this to be the case, simply rotate the connector 180 degrees. It is probably a good idea to launch the app and test your motor and lights before putting the shell back on your loco.

Please also note that the 8-pin connector does not take advantage of the green and violet wires (ACC3 and ACC4). If you would like to take advantage of those ACC controllers, please refer to the wiring diagram on this page to see how this is done (note – this will involve tapping into the blue wire for a positive connection for each light.)

DIRECT WIRING CONSIDERATIONS
If you are directly wiring your BlueRail board into a train, please refer to the diagram on this page for how to connect the colored wires from a 9-pin harness.

There are two mistakes that are easy to make when wiring these connections: it is easy to accidentally get the polarity wrong on either your track connections (red+ / black-) or motor connections (orange+ / grey-). If this occurs, your locomotive will run in reverse. It is probably a good idea to launch the app and test your motor before putting the shell back on your loco. Although we will create a place in the settings for you to correct for this, it’s best to get the polarity right in your wiring.