Category Archives: Articles

Troubleshooting connection issues with Blunami

Category : Articles , Blunami

If you are reading this article it means you are having trouble getting the Blunami app to connect with your Blunami decoder. This is not a common problem, but here are some troubleshooting solutions. You should try these steps IN THE ORDER they are presented (without skipping sections).

If you have an Android, get the brand name and model of the device (XXX) and google: “How to update the software on XXX”. You must be connected to the internet to do this.

If you have an iOS device go to Settings>>General>>Software Update

It is critical that you have the latest operating system supported on your smart device in order for the bluetooth connectivity to work properly.

Uninstall Blunami app from your device (completely), reboot your device, and reinstall the Blunami device.  Rebooting your device will solve the problem for the vast majority of users.

Unlike earbuds, speakers and other “classic” bluetooth devices you may have used in the past, you NEVER pair your Blunami from the “Settings” section of your device. If you do, your decoder will be UNAVAILABLE FOR CONNECTION within the Blunami app.

If you have mistakenly connected from the “Settings” section of your device, please use the “disconnect” option, and (if available) choose “forget this device”.

You’d be surprised how many people make this mistake and wonder why their Blunami app cannot connect to their loco.  Don’t feel bad.

***At this stage 80% of readers should have solved their problem (using the steps above). If not, READ ON!

It is quite rare (but not entirely unheard of) for a Blunami decoder to have an actual issue with the bluetooth module in the board.  If you have gotten this far and have not resolved your problem, it is time to rule out an issue with the board itself.

The only proper way to do this is to get access to another device (or devices) and see if they can connect to and run the board. If other devices (iOS or Android) are unable to connect to the same board, then there is a good chance the problem is in the board itself (or the installation).

Install the Blunami app on a couple of alternate devices and see if they can connect to the board using the Blunami app.  If other devices ARE able to control the board, then there is something going with your phone/tablet that needs to be addressed (ideas continued down below).  If you find 3 devices that are unable to connect to and run a Blunami, then there is a good chance there is an actual issue with the decoder itself (requiring replacement).  Before you do that, there is one more possibility to consider.

It is possible (although again, not extremely common) for an area to have wireless interference that prevents connections to be established. Examples of things that might cause this:

  1. A) an old wi-fi router that is not operating to FCC specifications
  2. B) an old wireless train control system (that is not operating to FCC specifications)
  3. C) wireless printers, monitors, wi-fi extenders (that are not operating to FCC specifications)
  4. D) an MRI machine

Except for the MRI machine, the key connection that links these offenders are devices that are “not operating to FCC specifications”.

The best test you can do is see if there is an alternate location you can take your Blunami to (like a friend's layout or a club) and see if you can connect there.  You can even take a small section of track to the backyard and hook it up to a 9 or 12 volt battery.

If you are able to connect to your Blunami in an alternate space or environment, then we know everything is good with your decoder and device, and can properly turn your attention to determining what is causing the wireless interference in your layout area. Troubleshooting suggestions for this will need to be addressed in a separate article.

***Information below is for people who have determined their Blunami decoder is functioning properly (ie you CAN connect using other devices, and have determined there is an individual issue with your device).

We are going to assume that you have already tried all of the following:

A) updated your device to the latest software
B) uninstalled Blunami app, rebooted, reinstalled Blunami app
C) determined the decoder works and your layout area is not subject to unusual amounts of wireless interference.

If your smart device is having problems and not connecting to your Blunami (having ruled out all the possibilities considered so far in this article) a solution that could very likely solve your problem is to do a reset on your device.

Before you do this, let's consider a few things:  Is this your primary device that you use for everything important in your life with lots of data, photos, music, and applications. Remember you can always find a device between $50 and $125 that will work perfectly as a controller. So picking up an affordable alternate smart device is a viable way to go (particularly if you have precious photos that have not been backed up).

Most devices come with varying levels of reset: soft reset, hard reset, factory reset…  Take a minute and research your particular device.  Maybe start with the “soft reset” (if that option is available) and see if it solves your problem.  Then work your way up.

Assuming you do not have your life’s work on the device in question, a complete factory reset followed by an update to the latest operating system is the most definitive way to get your device working as well as it is ever going to work.

For a complete factory reset on an iOS device, tap Settings>>General>>Transfer or Reset Phone>>EraseAll Content and Settings.  This will clean your device back to day one. It will need to be followed up with an update to the latest version of iOS your device supports.  Once you have done this, your device will run as well as it ever will, and if it will ever run a Blunami, it will now.

For Android devices, Google “How to reset my XXX (brand name and model) to factory settings”. Again, once this reset is complete, you will want it to be followed up with an update to the latest version of Android your device supports.

Although a device reset can be intimidating (particularly if it's your first time), this is probably the most definitive way to get a device working as well as it ever will, and if you have a stubborn device that won’t run a Blunami, this may be what will solve your problem.

*****Below is a Reference Document with further reading on Blunami connections*****


FURTHER READING:

The Blunami boards contain bluetooth low energy modules running bluetooth4 that connect dependably and are relatively free of connection issues. If you do experience connection issues, refer to this document for troubleshooting.


KEY POINTS:

  • Your iOS device must have iOS8 or newer and bluetooth must be turned on.
  • When you install the app, you will see a dialog box to give permission to connect. You must agree to this, or the connection will not work.
  • If you screw that up, the toggle to fix this is in the settings section of your iOS device listed under the Blunami app.
  • Do not attempt to “PAIR” with your Blunami in the bluetooth section of your iOS device. All connections are handled by the app.
  • Blunami can only pair with one iOS device at a time, and while paired the Blunami is “unavailable” for pairing with other iOS devices.

IF YOU ARE UNABLE TO CONNECT:

  • Is the Blunami receiving power? (apply power)
  • Is the Blunami connected to another iOS device? (power-cycle Blunami to make it available)
  • Reboot your iOs device. 99% of connection issues can be resolved by rebooting smartphone/tablet.
  • Try toggling “bluetooth” off and then back on in your smart device.
  • Is there wireless interference in my connection area? (see below)
  • Deleting and reinstalling the app will delete any cached bluetooth settings and may clear up the problem.
  • As a last resort you can reset your network settings in your iOS device. This will not delete apps or data on your phone, but it will cause your phone to forget any saved Wi-Fi passwords. To do this go to Settings>>General>>Transfer or Reset iPhone>>Reset>>Reset Network Settings

IS THE PROBLEM WITH MY BOARD OR MY iOS DEVICE?

We have had very few issues with bluetooth in the boards. 99% of the issues have been on the device side. Use this criteria to decide:

  • Is more than one iOS device is having problems connecting to a specific board?

    If more than one iOS device is having problems connecting to a specific board there are 2 probable causes: either the board has an issue with bluetooth (rare) or there is local wireless interference.
    To rule out wireless interference, retry your connection attempt in an alternate location.
    If you are able to connect to your Blunami on any device, try renaming the board in the Blunami app settings.


  • If only one iOS device is having problems connecting, please refer to the connection suggestions above.

ISSUES WITH WIRELESS INTERFERENCE

It is possible for wireless interference to affect connectivity. Possible causes:

  • Is your iOS device connected to a Wi-Fi network that does not have internet access or is experiencing temporary connection issues?
  • Is there a wireless Wi-Fi repeater in the area that is possibly causing interference?
  • Some older and off-brand Wi-Fi networks have been known to cause interference.

Temporarily turn off any networks in the area to identify if they are causing interference.

There are also apps available to help you identify wireless networks in a space and related issues.


List of Mac devices that will run Blunami app

Category : Articles

In addition to iOS devices, the Blunami app can run natively on all Mac computers that contain the M1 chip.

The M1 chip is in all Mac devices manufactured 2020 and newer. Here is a partial list of the Macs supported:

2020 and newer

MacBook Air
Mac Mini
MacBook Pro (13″, 14″ & 16″)
iMac
Mac Studio


Managing Connections with Multiple Users in Blunami

Category : Articles

When using the Blunami app to control multiple locos with multiple users in close proximity, its good to understand best practices to manage connections and avoid connecting to your neighbor’s loco.

Once a user has pressed the “Connect” button on a loco, the Blunami app assumes you are interested in automatically reconnecting to your loco (in the event of an unintentional disconnect). That way if your loco travels through a long underground tunnel or out-of-range, the app can automatically reconnect the moment you exit the tunnel. The app also provides toggle options in the settings to manage whether your loco will “stop on disconnect” (or continue rolling).

At this stage we have not added password protection to lock other users out of connecting to a loco. The protocol has a pathway to adding password protection, but implementing this opens up a whole can of worms related to lost passwords, and we are hesitant to travel down that track. Please follow the procedure below to help avoid any connection confusion.

Firstly, if you plan on operating your loco in a public environment with other users, please name your loco with a unique name you can identify (19 characters or less). The Blunami app can see all locos in range that are available for connection, and it will be easier to identify your loco if we all don’t name our loco “Blunami”.

When using a loco that you personally own and plan to connect to regularly (on the primary device you control it with) it is NOT necessary to hit the green “disconnect” button on the home screen when your session has ended. Simply close the app when you are done using. This way your loco will automatically connect to your primary device the next time you launch the app and it detects the loco in range.

If you connect to a friend’s loco using your device (or connect to a loco using a secondary device that you own) then please press the green “disconnect” button when the session has ended (prior to exiting the app). This will prevent your smart device from automatically connecting to that loco at any future time.

If you fail to press the disconnect button when a session has ended (on any device except your primary control device) the Blunami app assumes you want to automatically reconnect to it in the future. This could have potential undesirable effects. For example, if you leave you old iPad running the app on the counter, and have not purposefully disconnected from your loco in the last session (by pressing the “disconnect” button), if your loco powers up in range of that iPad, it might automatically connect to your iPad. When you go to look for the loco on your iPhone (primary device in this example) it may not be available for connection (as it is already connected to the iPad). Keep in mind that a loco will not appear available on the homescreen if it is connected to another device.

The best practice is to always disconnect from any loco (by pressing the “disconnect” button) when a session has ended unless you own the loco and are operating it on your primary device. If you ever power up your loco and find that it is not available on your homescreen, consider the possibility that it may be connected to another iOS device (that it has previously connected to). To make the loco available again, simply kill power to the loco momentarily to power-cycle the loco, at which point it should become available on your devices homescreen.

Also, always close the Blunami app completely when you are done using it (by “swiping upward”) to make sure the app is not running in the background (to avoid any unintentional disconnects).


How the Blunami app efficiently handles many users in one space

Category : Articles

You may wonder how the Blunami app is able to accommodate many simultaneous users operating in close proximity. The bluetooth low energy (BLE) protocol supports 40 channels and channel sharing (3 are reserved for special use). That means there are 37 available channels to transmit control signals. The DCC packet command signals sent by the app contain only a few bytes of data per command, which occupy miniscule portions of bandwidth. The Blunami app is carefully designed to prevent flooding the signal with command packets. The first 37 users operating in a small space will each have their own channel to send command signals to their train, and because the packet data is so small, each channel is available 95% of the time to handle command controls from other users (channel sharing).

The first 37 smart devices in a small space will be able to operate with negligible latency. The next 37 users in the room will involve channel sharing, so once you reach 74 users in close proximity, 37 of them might experience a latency of 20-50 milliseconds (in the event that any commands they send were sent simultaneous to another user). This 1/20th of a second should not really be perceptible. If you add 37 more users into this small space, 37 users will experience negligible latency, 37 might experience a 20-50 millisecond delay, and 37 might experience a 40-100 millisecond delay. Remember this latency will only occur if commands are sent simultaneously, so there is a good chance that might not happen at all.

Channel sharing (technically referred to as Adaptive Frequency Hopping) is more sophisticated than the simplified process described above, but that’s the idea. Its worth saying that there are other BLE devices (like Apple Watch and FitBit) which may also transmit packets in these channels if operated in the same space.

The take home message is that between the 37 channels available in BLE (bluetooth low energy), channels sharing, the brevity of the packets, and the Blunami app’s careful design on packets sent, users should not expect a tremendous amount of latency when operating at close quarters with other users.


Myths and Advantages of Bluetooth Model Train Control

Category : Articles

MYTHS ABOUT BLUETOOTH IN MODEL TRAINS


WHY IS BLUNAMI A GOOD SOLUTION FOR MODEL TRAIN CONTROL?


HOW IS BLUNAMI DIFFERENT FROM OTHER TRAIN CONTROL PRODUCTS?


Blunami App Screens


WHAT HAPPENED TO THE BlueRail Trains APP?

The BlueRail Trains app was renamed the Blunami app.


HOW ABOUT O GAUGE AND O/S SCALE?

Blunami requires DC or DCC power to operate. AC track-power users will need to use DC power, or supplement their installation with an in-loco AC-DC converter.


In-app sound is turned off in BlueRail Trains app for BlueRailDCC

Category : Articles

At present we have in-app sounds turned off when you use the BlueRail Trains app to control BlueRailDCC boards. You may be wondering why we have done this.

To build this technology, the guys at BlueRail have spent thousands of hours over the course of 8 years. Making new technology for trains is not a lucrative business. The model railroad market is small, and the hobbyists want as much functionality as they can, and they don’t want to pay a lot of money for products. People who make model train technology understand any income they received will be dwarfed by the amount of time spent developing the product. It is a labor of love, and we do it because we love the hobby and want model railroaders (and our friends) to have excellent train control.

BlueRail began developing the BlueRail app for the Blue Horse 8 years ago, and it released in 2015. 6 years later, people have contacted BlueRail complaining that the iPhone they purchased in 2021 is having trouble playing sounds for the $75 board they purchased 6 years ago. Our programmers and team spend hours investigating this, and to date the problems have always been on the user end. But one of these days, Apple is going to make a change that affects in-app sounds. 10 years from now, someone will contact BlueRail and complain that their iPhone 30 is having problems with in-app sounds (because of a change Apple made somewhere down the line).

Its one thing to ask your highly-skilled programmer friends to spend thousands of unpaid hours developing a cool train technology so hobbyists can enjoy it; its another to ask that friend to support app updates for the rest of their life. Another example, at the end of 2019 the sound code library used in the BlueRail Android app changed its license from free to a pay model. To prevent Android users from being disappointed, BlueRail paid (out of pocket) a contractor Android programmer to make changes to the app, and BlueRail had to assume a subscription fee to keep the library going.

If we turn on in-app sounds for the BlueRailDCC boards, users will want that sound to run forever. If the sounds stop working in 10 years, they will want the BlueRail programmers to come out of retirement and promptly fix the problem, on a project that the programmers donated thousands of free hours to develop.

Instead, we have modified our protocol so we can control DCC sound decoders, which are available in a wide variety of prices and qualities. Users have the option of spending as much (or little) as they want on a sound solution, and if they don’t want to spend a penny, the board is also capable of operating without a sound decoder.

I understand some people will be upset that we have made this decision. There will be negative comments posted. I very much hope those people will read this article, and better understand our position. And we hope many people enjoy the technology we have spent all these hours developing for many years to come.


What are CVs & Functions in DCC?

Category : Articles

The DCC standard in model trains was established in the early 1990’s by the NMRA as basic standards for controlling model trains. Because this standard was established prior to major innovations in computers, the internet and wireless technologies, some aspects of DCC seem dated to the modern observer (particularly the method of communication between the loco and the controller). The aspects we are focusing on in this article (Functions and CVs) are as relevant and useful today as they were 25 years ago. This article is intended to serve as a primer to a basic understanding of what Functions and CVs are (and why they may confuse some users). We hope the article sheds a little light on the mystery.

FUNCTIONS

FUNCTONS (“Fcn” or “F”): Functions are features that your decoder is capable of which can be triggered by the press of a button. Simple examples of features are blowing the airhorn, ringing the bell, or turning the headlight on and off. Most modern decoders support 28 functions (although some support more).

SOURCE OF CONFUSION 1: The NMRA DCC standard is “loose” and “flexible” in that it allows different decoder companies to use Functions and CVs differently. So although almost all decoders agree that F(0) is the headlight, F(1) is the bell, F(2) is the long airhorn and F(3) is the short airhorn, the remaining 25 functions may vary from manufacturer to manufacturer. This “feature” of “flexibility” has allowed decoder manufacturers to innovate, but it has also muddied the perception among users about understanding functions.

Here are the standard FUNCTION defaults for some popular decoders:

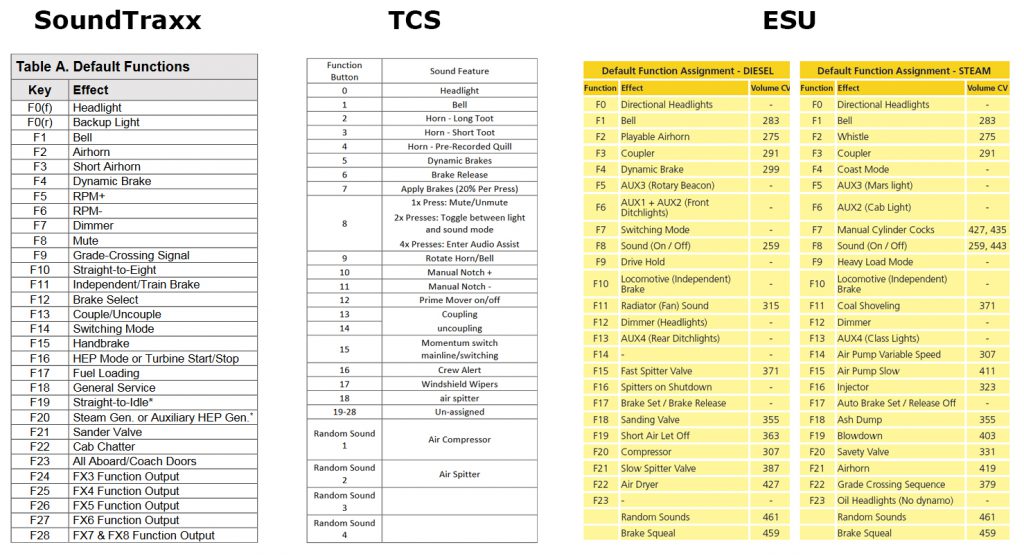
SOURCE OF CONFUSION 2: Another thing that can be confusing about functions is that most decoders allow you to “Remap” function buttons. Although F(1) is usually the function for triggering the bell, your decoder may allow you to “Remap” F(1) and associate F(1) with playing the airhorn (or muting the sound in your decoder altogether). This feature can be beneficial for many things, but it also introduces a bit of confusion that functions “can be anything you want them to be”.

Because the DCC standard of functions are “flexible” and can be “remapped”, the typical handheld cab controller for DCC looks more like a calculator that a train controller.

SOURCE OF CONFUSION 3: Most decoders have additional colored wires that can be used to power additional lights (or other functionality). These wires are often called “FX”. FX1 is the headlight, FX2 is the backup light. If your decoder has more than 2 of the wires, the are referred to as FX3, FX4, FX5, FX6 etc. You may use Functions to trigger these lights. On SoundTraxx decoders, by default you can use Function(23) to trigger FX3. You can see the possible confusion in having F(23) trigger FX3: too many capital F’s. (Also many people use the abbreviation FXN for the word “function” – an unfortunate obfuscation).

Functions in DCC have 2 states: “on” and “off”. The first time you press the “Bell” button on a DCC cab controller, the controller sends and F(1)-ON command to the train (and the bell starts ringing). The next time you press the “Bell” button, the controller sends on F(1)-OFF command to the decoder (and the bell sound turns off). So the function buttons alternate the command being sent (on/off) and the function can be toggled on and off. This is how most functions operate in DCC. This takes us to…

SOURCE OF CONFUSION 4: The long airhorn (which is typically associated with F2 ) turns “on” the moment you press it and “off” the moment you release it. The short airhorn (F3) plays a short airhorn blast every time you press the button (so there is no concept of “toggling” the short airhorn on and off).

So although functions in general can be toggled on and off, our 3 favorite sounds (bell, long airhorn, short airhorn) each behave slightly differently.

This can be taken a step further with more complicated features. Many modern decoders offer “Dynamic Brakes” as a function. Dynamic brakes (in the real world) are applied in several steps. On some modern decoders you will press F4 (or F5) to trigger the Dynamic Brakes, and each time you press F4 you will get a different phase of Dynamic Brakes (1,2,3,4) before finally cycling back to Dynamic Brakes being “off”.

As you can see, functions in DCC can be a very simple concept (like triggering your horn or turning the bell sound on and off), but some aspects are confusing.

Functions in BlueRailDCC

In BlueRailDCC you trigger functions in your train by sliding out the function panel. This panel has 28 function buttons in 2 rows: 1-14 and 15-28. When you first connect to a train, the app will ask you to choose which decoder type you are using (SoundTraxx, TCS, ESU etc). If you have selected one of these popular decoders, the default function names will be listed on the buttons. The Function 1 button will say “Bell” on it. If you are using a decoder not listed, you can choose the default “128 CVs”, in which case the buttons will be labeled F1 – F28. If you slide the function panel further out, you can rename any function button and choose whether you want the button to “toggle” or “press-release”.

If you are using the BlueRailDCC without a decoder, the function panel will be empty (as there are no sound features to trigger).

CVs

Confusion about Functions pales in comparison to confusion about CVs. CVs are “configuration variables” which are a table of settings to customize features of your decoder. The CV table in your decoder resembles a 2 column spreadsheet with the CV number in the left column and the CV value in the right column. The “value” of the CV can generally be any value between 0 and 255 (although some CVs use a more limited range). The CV table contains 1024 rows.

As a typical example CV3 is used to control the acceleration rate of your loco. If you set CV3 to “0” your loco will take off as quickly as it can. If you set CV3 to a higher number (255 or below) then the train will behave as if it is pulling a heavy load and take off slowly.

Your decoder manufacturer will offer a userguide containing the CV table for your decoder. Some examples of typical things you may want to adjust in your loco using CVs include:

  • acceleration/deceleration
  • master volume level
  • select preferred horn, bell, engine sounds
  • control volume level and reverb of individual sounds

Generally these are things you will tinker with once and never access again in your decoder. It is not uncommon for a modern decoder to have 200-300 controllable settings. This sounds pretty straight forward – so why do people consider CVs complicated? Does BlueRailDCC makes this easier? (yes)

SOURCE OF CONFUSION 1: The NMRA DCC standard is “loose” and “flexible” in that it allows different decoder companies to use CVs differently. A general list of the NMRA CV list can be found here:
https://www.nmra.org/sites/default/files/standards/sandrp/pdf/s-9.2.2_decoder_cvs_2012.07.pdf

CVs 1-46 and 65-112 are fairly uniform, but beyond that CV usage varies from decoder manufacturer to decoder manufacturer. Every decoder has a userguide which details the CV table for your decoder. To control the master volume on a SoundTraxx decoder you adjust CV128. On an ESU decoder master volume is CV63. Refer to your decoder userguide for specifics.

This is simplified in BlueRailDCC. Once you have selected your decoder type (SoundTraxx, ESU, TCS etc) the CV Settings page will display the appropriate table for your decoder. To access this from the train control screen (throttle) select the “settings cog” in the lower right. Then choose “CV settings” from the settings page.

With this much information, you should be able to use the BlueRailDCC app to run your train, trigger functions, and edit CVs. If you’d like to learn more about why CVs may be confusing and why BlueRailDCC makes life a little easier, read on…

SOURCE OF CONFUSION 2: The original DCC spec only allowed for 256 CVs, so adjustments needed to be made to accommodate more CVs. To allow for more CVs, DCC added the concept of “pages” (page1, page2, page3).

CVs 1-256 are reserved for the original CVs. This leaves CVs 257-1024 for each page of additional CVs. As an example, page1 CV257 is often written as 1.257. Page 1, 2 and 3 look like this:

  • page1 (257-1024) or 1.257-1.1024
  • page2 (257-1024) or 2.257-2.1024
  • page3 (257-1024) or 3.257-3.1024

Your decoder userguide will show these CV pages (if applicable) for your decoder.

As a bonus point of confusion, in order to change the values of a CV on any page (1,2,3, etc), DCC requires you to enter the page number into CV32 (1,2,3) as a first step. So to change the value of CV 1.257 to 99 you would set CV32 to “1” followed by setting CV257 to “99”.

When editing CVs 1-256 the “page number” will be ignored.

All issues regarding pages (and CV 32) is automatically handled in BlueRailDCC.

SOURCE OF CONFUSION 3: In the DCC standard, you are generally able to change (or “Write”) the value of any CV while the train is running on the rails, but if you want to “Read” the value of a CV, you need to remove the loco from the “main” and put it on a “programming track” where the decoder can be interrogated in “service mode”. This programming track operates on lower voltage, and you can only have one loco on the programming track at anytime. The decoder is not capable of explicitly telling you the value of any CV; instead the decoder can only make a single voltage pulse (known as an acknowledgment or “ack”) to answer “yes” to any question you ask it. As you know, CVs can have values up to 255 – which is 8 bits of information – like 10101010. It requires 8 “yes or no” questions (and 8 acknowledgments) to learn the value of any CV. This entire transaction can take 1-2 seconds to learn the value of 1 CV. As you can see, CV reads are relatively slow, and cannot be performed while the train is running.

BlueRailDCC simplifies this, in that the programming track is built into the board, so you don’t need to worry about having a programming track. The moment you try to read the value of any CV (in the CV settings page) your decoder will go into service mode, during which it cannot move or make sound – so you will probably want to have your train stopped when reading CVs.

You can “write” CVs while the train is moving – so you can change the master volume of the decoder by sliding the value of CV128 (Soundtraxx) or CV63 (ESU) while the train is running. But if you want to ask a decoder (ie “read”) the value of CV128 you will need to stop the train (or it will stop itself).

In BlueRailDCC you can read the value of any CV at anytime. The app also has a “Read All CVs” button. If you are using a modern recent decoder by SoundTraxx, TCS or ESU, we have pre-populated the CV pages with the common default values. So if your decoder is new (or has been factory reset) you may not need to read CVs at all – simply use the defaults in the “CV settings” page.

To “Read All CVs” in BlueRailDCC, open any CV section (ie CVs1-128) and press the “Read All CVs” button. The app will run through each CV in order and read each CV. This will take 1-2 seconds per CV, so this might be a 5 minute process in some cases.

Once the CV values have been loaded into the app (or if you are using the default values within the app) you generally won’t need to mess with “CV reads” any more.

NOTES ON TCS

Recent TCS decoders have a different approach to CVs. Instead of laying the CV settings out into Page1, Page2 and Page3 etc, TCS has 4 CVs which you edit in a particular order. So TCS does not have a master volume CV. All volume is managed using the 4 CV procedure. We have placed those 4 CVs at the top of the CV editing page for convenience within the BlueRail app (if you have selected TCS as your decoder type).

TCS also offers a “voice assistant” in recent decoders. To exit voice assistant you must press F(0). In BlueRailDCC use the headlight button for F(0) exit.

For more information on BlueRailDCC explore this website or consult the BlueRailDCC Userguide.


Turning off Back-EMF in BlueRail and EZ App

Category : Articles

(This Article applies to EZ App trains and old Blue Horse boards – NOT BlueRailDCC boards). The new BlueRailDCC boards instead control decoders that may have similar back-emf control features.

Back-EMF is a method using in model train circuitry to help your locomotive maintain speed and compensate for load differences from resistance encountered as it travels up and down inclines and pulls cars about your layout. For the most part, back-EMF is a valuable and essential part of smooth train operation. It helps your train manage its speed to match your throttle level. But there are times when you may want to turn back-EMF off.

Some people use BlueRail boards to power the rails of a conventional DC train set. If you plan on using multiple BlueRail boards to control different blocks on your layout, you will need to turn off back-EMF in each board. This is accomplished by going into the “Settings” screen in the app for each board, and toggling on the “Advanced Tuning” panel. Then, using the “Tuning Fork” button (now accessible in the Train Control screen) set the following three settings to a value of “0”: Proportional, Integral, and Differential. With all 3 PID values set to “0” back-EMF will be turned off. If you do not turn back-EMF off, you may find that your locos slow down briefly as they enter each new block.


Why is shipping batteries overseas an issue?

Category : Articles

One might wonder why shipping batteries between countries has become such an issue. Recent incidences involving batteries (fires and explosions) have resulted in restrictions in the international shipping of batteries. Batteries for running model trains are fairly small and less hazardous, but are still subject to shipping restrictions. The shipping of individual batteries (not directly connected to the product intended for use) are heavily restricted, so like most other merchants, BlueRail is unable to ship individual Li-PO batteries internationally.

Under strict guidelines, a battery may be shipped internationally IF it is safely connected to the product intended for use. So products (like the BlueRail DeadRail kit) which contain a rechargeable battery can be shipped internationally, understanding that it will be categorized as “dangerous goods” and subject to customs inspection (and possible associated delays).

In order to provide good customer service, a merchant who sells a battery-operated product should be prepared to ship a replacement battery (should that ever be required in the future). Unfortunately, the shipment of individual batteries is not possible (through standard post). For this reason, most merchants (including BlueRail) are hesitant to send battery products through the mail between countries (understanding that they may get bogged down in customs, and/or potentially result in poor customer service experiences should replacement batteries ever be needed).

Battery-powered model train control products (like BlueRail) are popular in the US, Canada, UK, EU, Australia and New Zealand. The best solution for DeadRail hobbyists (outside the US) is to find a local source of rechargeable batteries in your area (to avoid international battery shipping issues). BlueRail sells Battery-Power boards (without batteries) to all the regions listed, to which you may connect any appropriate battery. Please consider all safety and quality issues when choosing a rechargeable battery for your train control needs.

Rechargeable Battery Source US:


Controlling Kadee® Servo Controllers with a BlueRail board

Category : Articles , Videos


This video demonstrates how to control a Kadee® Servo Controller with a BlueRail board to operate a large scale Kadee coupler with battery power. The BlueRail board can control up to 4 Kadee® Servo Controllers. Kadee® Servo Controllers can control Kadee® RC Remote Couplers (factory programmed), turnouts, crossing gates, semaphores, windmills, water wheels, gondolas, trams, roundabouts, cranes, & drawbridges. Below is a diagram depicting how to make the connection. Click image to download PDF.

Controlling Kadee® Servo Controllers with a BlueRail board
http://bluerailtrains.com/docs/Kadee_Servo_Control_with_BlueRail_Board.pdf