Category Archives: Articles

Understanding and Troubleshooting Bluetooth Connections

Category : Articles

This article explains connecting and disconnecting from a bluetooth train.

When a train or board is powered up and in range, it should appear in the home screen of the application with the option to “connect” or “disconnect” from any train. Once you have “connected” to a train it is no longer visible to other users (or other applications) until you choose to “disconnect” from a train.

If a board or train is powered up and in range, but you do not see it in the app home screen, there are two probable causes. Either bluetooth is turned off in your device or the board is being occupied by another user (or application).

IS BLUETOOTH TURNED ON?
The app attempts to alert you whenever bluetooth is turned off, but if you are not seeing a bluetooth board this is the first thing to check. Bluetooth is managed in the “settings” of your phone/device. Be aware that being in “Airplane Mode” will generally turn off bluetooth.

IS ANOTHER DEVICE OCCUPYING BLUETOOTH BOARD?
If a train or board is powered up and in range and still not visible, check to make sure there is not another smartphone or tablet in range running the BlueRail or E-Z App that may be occupying the board. You must choose “Disconnect” (or close the app entirely) from the occupying device to make it available to other users.

One definitive way to “release” connections is to temporarily kill power to the board/train. This will cause the board to reboot and become available for connections.

IS YOUR DEVICE’S SOFTWARE UP TO DATE?
It is very important when using Android (or iOS) to run bluetooth trains that you update your device to the latest software available for your model. Please refer to THIS ARTICLE about how to update your device to the latest version of Android.

IS ANOTHER APPLICATION ON SAME DEVICE OCCUPYING BLUETOOTH BOARD?
If you run both the BlueRail app and the Bachmann E-Z App on one device at the same time, it is possible for one app to occupy a train, making the app unavailable in the other application. Please make sure all other bluetooth train control apps are completely closed when running your train.

RUNNING BLUETOOTH IN A GROUP ENVIRONMENT
When operating bluetooth trains in a group environment, please turn off “Auto-Connect” from the home screen of your app. Auto-Connect is a handy feature for use at home, enabling your device to automatically connect to all trains (saving you from having to hit the “Connect” button). When operating in a group, turn this off and manually connect to trains using the “Connect” button. To make a train or board available to another user


Using 8-pin Connectors

Category : Articles

There are several general methods for connecting a BlueRail board to a locomotive.

9 PIN CONNECTOR
If you are plugging your BlueRail board into a “DCC-Ready” locomotive equipped with a 9-pin connector, simply plug the board into the connector (and you are done).

8 PIN CONNECTOR
If you are plugging your BlueRail board into a “DCC-Ready” locomotive equipped with a 8-pin connector, it is important to orient the connector correctly (as the pin can be inserted one of two ways). Please refer to the diagram below for reference.
NMRA 8 pin plug
The circuit board in your locomotive should have a small triangle or dot indicating where the number 1 pin (orange) should go, which will help you orient the 8-pin connector correctly. (It is possible the number 1 pin location is not marked.) If you connect the pin in the wrong orientation, your locomotive will run backwards and the lights will not work. If after installation you find this to be the case, simply rotate the connector 180 degrees. It is probably a good idea to launch the app and test your motor and lights before putting the shell back on your loco.

Please also note that the 8-pin connector does not take advantage of the green and violet wires (ACC3 and ACC4). If you would like to take advantage of those ACC controllers, please refer to the wiring diagram on this page to see how this is done (note – this will involve tapping into the blue wire for a positive connection for each light.)

DIRECT WIRING CONSIDERATIONS
If you are directly wiring your BlueRail board into a train, please refer to the diagram on this page for how to connect the colored wires from a 9-pin harness.

There are two mistakes that are easy to make when wiring these connections: it is easy to accidentally get the polarity wrong on either your track connections (red+ / black-) or motor connections (orange+ / grey-). If this occurs, your locomotive will run in reverse. It is probably a good idea to launch the app and test your motor before putting the shell back on your loco. Although we will create a place in the settings for you to correct for this, it’s best to get the polarity right in your wiring.


Isolating Motor and Lights from the Frame

Category : Articles

In order for your BlueRail board to work properly, it is important that both the motor and all lights are not in contact with either the chassis or the rails. If your locomotive is already “DCC-Ready” this is probably already taken care of. Here are the steps to verify the motor brush terminals are isolated from the chassis and the rail pickups. This will require an ohmmeter or a continuity tester.

1) Remove the shell from the locomotive (and the tender for steam installations) and place your locomotive on a section of non-powered track.

2) Within the locomotive, locate and identify all wires (+/-) to the rails and all wires (+/-) to the motor connections.

TEST ISOLATION OF MOTOR

3) Disconnect all wires that lead to the motor terminals.

4) Using your ohmmeter or continuity tester, connect one probe to the negative motor terminal, and touch the other probe to the chassis – making sure there is no continuity. In a similar fashion, touch the second probe to each of the rails and verify there is no continuity to either rail.

5) Repeat this process for the positive motor terminal and verify there is no continuity to the chassis or either of the rails.

TEST ISOLATION OF LIGHTS

6) Disconnect all wires that lead to each light.

7) Repeat the above steps for each light connection to verify there is no continuity to the chassis or either of the rails.

If you find continuity, you must correct the problem in order to make your locomotive “DCC-Ready” and capable of supporting a BlueRail board. Some motors sit directly on the chassis or are connected by a spring clip grounding the motor to the chassis. This continuity can often be corrected by either removing the spring clip, or inserting a plastic washer between the motor and the chassis.


Battery Powered Trains

Category : Articles

Blue Horse - with battery leads
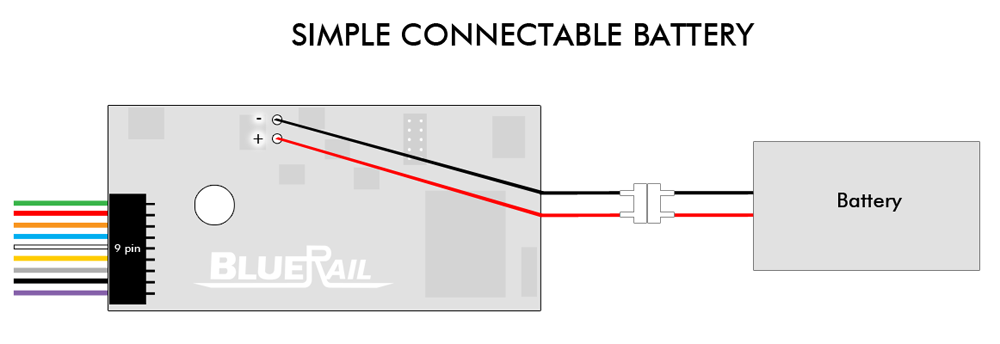
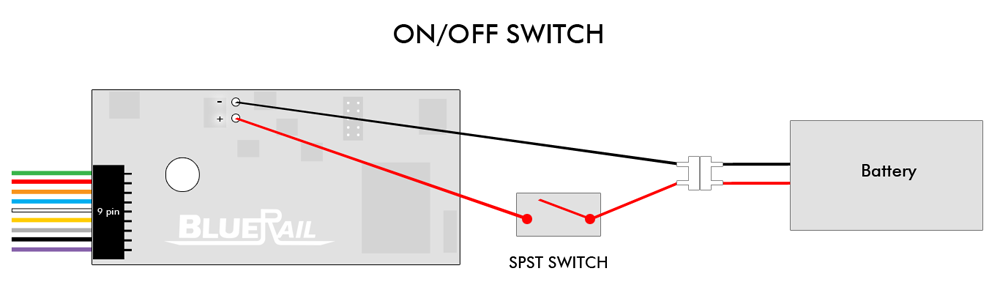
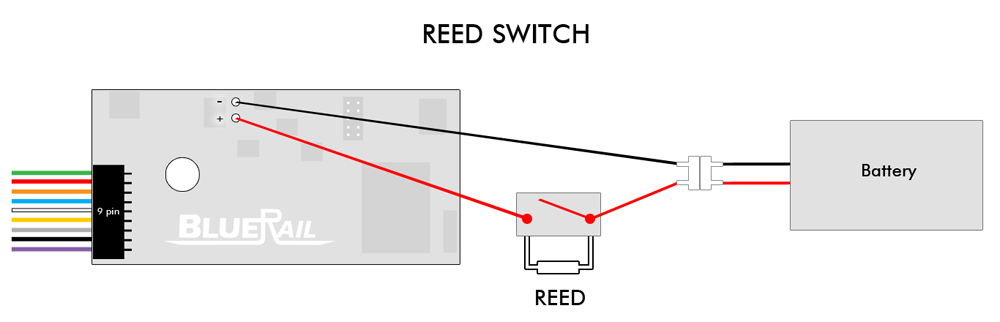
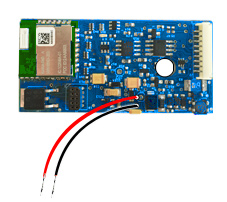
Because bluetooth does not rely on track for loco control, it is an excellent method for battery powered train operation (also known as “Dead Rail” or “Power On Board”). BlueRail plugin boards come with 2 connection points (+/-) which can be wired to a battery. Below are a few ways you may choose to wire your battery.

SIMPLE CONNECTABLE BATTERY

The simplest way to add battery power is to add a connection that allows you to plug or unplug a battery. This simple connection makes sense if your battery is easily accessible, and is often a good first step if you are new to Dead Rail. When using this method, it is important to disconnect your battery at the end of each operating session (otherwise the battery will continue to power the board and drain the battery).

Simple Battery Connection

ON/OFF SWITCH

You may add a simple on/off switch to your battery connection. This makes sense if your locomotive has room to put a switch you can reach with your finger. The advantage here is you don’t need to remove or disconnect the battery at the end of each operating session (A single battery charge may last several operating sessions depending on use). A simple switch is also called a single-pole single-throw switch (SPST)

ON-OFF

REED SWITCH

A nicer solution is for your on/off switch to contain a “reed switch”. This is a small component on the switch that allows you to throw the switch by waving a magnet over it. The setup below is what is included in a Dead Rail Kit (which is completely plug’n’play).

Reed Switch

RECHARGING CABLE/JACK

You can add a charging connection (or jack) between the switch and the battery to allow you to charge your battery using a charger without removing it from the loco. Make sure the switch is in the “off” position when charging your battery.

Charging Jack

CHARGING BATTERIES THROUGH THE RAILS

Here is an example of charging battery through the rails.

CONNECT BATTERY DIRECTLY TO RED/BLACK ON 9-PIN JST

You may also connect a battery directly to the red/black wires on the 9-pin JST (instead of using the battery leads).

Article on BlueRail DeadRail Kit
Article on Charging Batteries

DEADRAIL RESOURCES

Here are some resources for Dead Rail information and products.

Dead Rail Society – A great resource for DeadRail information.
Dead Rail Installs – Custom Dead Rail installs and Dead Rail Kits.
Stanton – S-Cab – Radio Control and Battery Power for Model Railroads

Please let us know if you would like your link added to this list.


Testing Motor Stall Current

Category : Articles

It is important to test your locomotive’s stall current to make sure it is compatible with this BlueRail board.

1) Set your locomotive on a section of track with a DC power-pack powered at the maximum voltage you would operate your train (typically 12-16 volts).

2) Connect a DC Ammeter in series with one of the track feeders (as in the diagram).

Testing Motor Stall Current

3) Hold the locomotive firmly in your hands (so it can’t move), pressing down on the locomotive to prevent the wheels from spinning, and power up the power-pack.

4) Make sure the power-pack voltage remains constant (to get an accurate reading) at the maximum voltage you intend to run your train.

5) Measure and note the current the locomotive is drawing. This is your locomotive’s “stall current”.

If your stall current exceeds 2 amps please read THIS ARTICLE.

If you are testing your loco’s SLIP CURRENT, use the same procedure, but hold your loco with lighter pressure (so the wheels are able to SLIP). A loco with a slip current of 2 or less will work with this board.

Please see more detail on “Overload Protection” for more details on the board’s current draw limitations.

For larger scale locos, if you are measuring your loco’s stall current, it is also worthwhile to find out your loco’s “slip” stall current. That is, the maximum current draw at the point where your loco’s wheels begin “slipping”. (This is usually a factor of whether your loco has traction bands on the wheels.) You can measure this by performing the test above, but only pushing down hard enough till the loco wheels are just beginning to slip, and noting the amperage reading. A Bachmann Large scale 4-6-0 might have a hard stall current of 4.6, but have a “slip” stall current of 1.5 – meaning the wheels will start spinning once you reach 1.5 amps (and will probably never reach 4.6 unless you add extra weight in the loco or traction bands). You might base your assessment of whether the first BlueRail board is suitable for your loco on the “slip” stall current (rather then the “hard” stall current).